Showing posts with label laurldesigns. Show all posts

Sunday, January 20, 2013

Ice Dying- Snow days - the results

So, I have finished washing and drying my ice dyed, then snow dyed garments!


 First the snow and powdered dyed....


 Then it melted... yes there are some leaf bits and stray pine straw. It's snow in the south, we do not have blankets of the stuff to work with!


Tank top one, lots of turquoise! And, the yellow over dyed well.

Tank top 2- the red held it's own with the barrage of turquoise, navy and celadon.

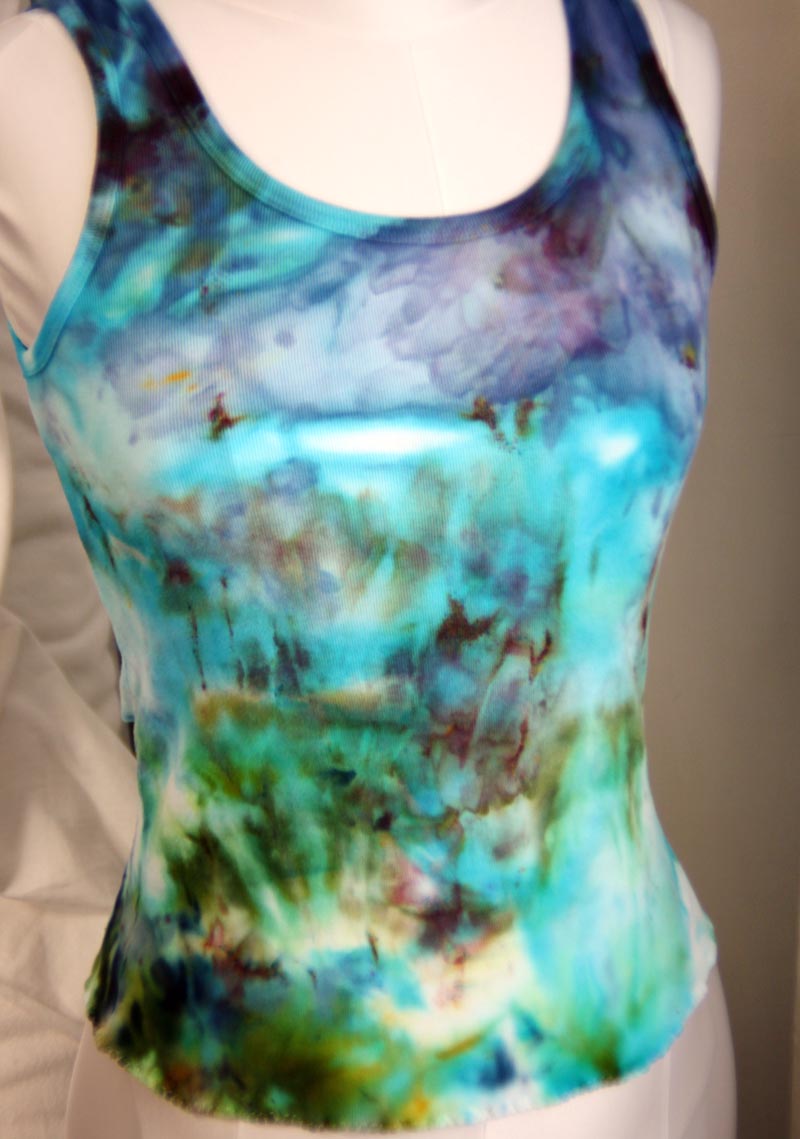
Tank top 3- this one had the most of the green that went yellow, as well as some palomino gold, which interestingly did not turn green.

LESSONS LEARNED-

I wash a load right after these and they seems to have turned a bit blue. So it is either that my HE washer  did not drain all of the water thus depositing, or I remember that I did not re-mix the soda ash mix, which is in it's third use, so it is possible that the chemical reaction was not as strong and more dye released than expected.
~ So, mix the soda ash well
~ Perhaps only use it two times, or replenish
~ Only wash darks after a dye load
~ Try those "color catchers" from Shout


Let me know what you think!

Saturday, January 19, 2013

Ice Dying - take three - snow dying

It is a rare thing to see snow in Alabama. I took advantage of this rare occurrence to work on my ice dying project. Since ice dying originated with snow dying and my second experiment left a bit too much white on the garments, I decided to redye with the left over snow.  Leftover snow is even rare-er! But at least in the Deep South, snow one day, warm temps the next!

I can see a distinct advantage to using snow, or shaved ice. ( I realized that I could use shaved ice in the summer, or anytime without snow, to replicate this process, if I like it better than it ice cubes from the fridge.) You have precision in the placement of the dyes. As well as, you can get a more even distribution of the dye once the snow melts. OK, this last statement was an assumption, we will see one the garments come out of the dye bath. The garments were mostly green from the first time with a few bits of other colors.

I also had another realization, that I think was proved in second dye process, where the color was most intense, which means where it had the most powdered dye, dyed to the color base, not necessarily to the actual dye color. For example, the greens had a base of yellow, so the center of the green went yellow and the edges were green. The navy went purple in the center and the edges were purple. This could be a reaction with my water, so dying with the snow will eliminate most of the reaction if it is my local water.

Here's my process pics-
I used celadon,  turquoise and navy. This is my color map.

process pic without the arrows and words.


Saturday, January 12, 2013

icy dying- first dye

Today I am starting a new dying technique featured on Dharma Trading Company's website a couple of weeks ago. See the step by step here! I am working with a variety of items on this first dye- two silk scarves, a tee shirt from Anvil and some baby hats from Snowflakes.

I am following Dharma's ice dying instructions to a tee, so I'm not going to re-invent the wheel for instructions. However, I will add some images of my process. The actual dying process take 24 hours. I have included a "map" to what items I have where in my container and what colors I put where. I will be interested to see what the colors look like and how they mix. By creating a map I can be a bit analytic in a process, though there are no guarantees of the outcome. This items went directly from the washer to the soda ash to the ice. I have other items that were washed, but not dyed. We will see if there is a difference!

Outcomes posted tomorrow!!!

Tight shot of the dye on the ice cubes.


The over all image of the ice with dyes on the garments.

A "map" of the colors used and the garments they are on.  I might have used more colors than listed, but this is a pretty good idea.

Wednesday, January 18, 2012

Tags made special

So I wanted to send a little note to another blogger and instead of pulling out the stationery, I decided to use one of my large blue tags. They are great for a few lines of a note and because they are tags, you can make a fun tassel off of the end. I used some bits from making my embellishment nests. You can find color coordinated seam bindings and yarns here.

Here's how-

You will need:
seam binding, ribbons, yarns or trims  6 peices about 10 inches long
a parcel tag
a pencil (I like prismacolor pencils)
ruler


 Start by drawing lines on your tag, I like adding a flourish to the end of the line


2. Trim the ends of the seam bindings and ribbons diagonally to prevent fraying.
3. Lay fibers together and fold in half

4. Thread the fold into the hole of the tag


5. pull the loose ends of the fibers through the loop on the tag

6. Snug the fibers and fluff!


Saturday, December 10, 2011

I'm on the front page!


Check out my awesome spirograph cards!

Animal Magnatism

I seem to have a recent obsession with animal prints, specifically leopard. Used judiciously animal print can be amusing and classic in design... used overzealously in the wrong combo, it goes trashy fast. Here are a few ideas from my Laurl Designs store of easy ways in incorporate leopard in to your life.


The knobs are great for bathrooms and bedroom dressers. They can even be used in a child's room with a safari look!


The coffee cozy rocks your morning java into something much cooler than coffee.


And, who could loose your keys with that much animal magnatism! The back of the monogram letter is racy red... could be awesome for your hot car!

Shipping tag jotter- how to

This is a fun jotter that can easily be made for a gift tag on a gift or a stocking stuffer! You will need: 2 large parcel tags, some theme paper, a stapler, glue and some pretty paper or paper lace tape to finish. Optional mod podge for sealing.
Easy Peasy Instruction- cut your theme paper 5 inches by 2 1/2 inches ( I used about 20 peices of cut for my jotter), then stack the paper and align it between the two tags. staple the paper and tags together at the top. ( I used two staples), then glue your pretty paper to cover the staples and voila! You have a tag jotter!
Optional, you can coat the front and back with mod podge for extra durability and a smidge of shine!


Monday, December 13, 2010

Big hits-

My Twilight inspired coffee cozies are such a hit I'm planning on a series of beach themes. The textural nature of the needle felted stones combined with the coat weight wool is a delightful combination in your hands... not to get them in more hands!

Sunday, December 12, 2010

December coupon codes

Please use the following coupon code in my store laurldesigns.etsy.com during your checkout  for a 15% discount!

code-  bloggersnow

Enjoy the savings!

First Beach coffee cozies

I have added the newest version of the Twilight inspired "First Beach, Second Glance" coffee cozy to the laurldesigns.etsy.com store. This is hand needle felted and a popular item in my shop. I was inspired by the description of First beach looking like grey pebbles at first and then upon a second look, it looks like jewels. These jewel colored "pebbles" are on a heavy coat weight wool base on brown tweed and can be hand washed in cool water. twilight-first beach,closer look coffee cozy

I am featured in this Treasury!